When faced with plumbing issues such as leaks, corrosion, or deteriorating pipes, homeowners often seek effective solutions that minimize disruption and restore the integrity of their plumbing systems. Pipe lining, a trenchless technology, has emerged as a popular method for rehabilitating existing pipelines without the need for extensive excavation. In this blog, we'll provide homeowners with a detailed overview of the pipe lining process, outlining what to expect at each stage, and empowering them to make informed decisions about their plumbing repairs.
1. Inspection:
The pipe lining process typically begins with a thorough inspection of the existing pipeline. Advanced camera technology is used to assess the condition of the pipes, identify areas of damage, and determine the extent of rehabilitation required. This step is crucial for developing a tailored solution that addresses the specific needs of the plumbing system.
2. Cleaning:
Before lining the pipes, it's essential to ensure that the interior surfaces are free of debris, scale, and other obstructions that could compromise the effectiveness of the lining. High-pressure water jetting or mechanical cleaning methods are employed to remove buildup and prepare the pipes for lining. This thorough cleaning process is essential for maximizing the adhesion of the lining material to the existing pipe walls.
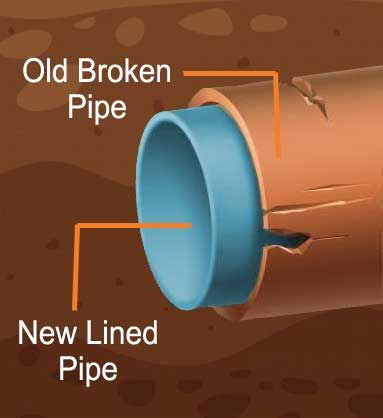
3. Liner Installation:
Once the pipes are cleaned and prepared, the flexible liner material is inserted into the pipeline using specialized equipment. The liner, typically made of materials such as fiberglass or felt, is impregnated with a resin solution that bonds to the interior surface of the existing pipe. Various installation methods, such as inversion or pulling, may be used depending on the specific characteristics of the pipeline and access points.
4. Curing:
After the liner is in place, the curing process begins to harden the resin and form a durable, seamless lining within the existing pipe. Curing methods may include the application of heat, UV light, or steam, depending on the type of resin used and environmental conditions. This step is critical for ensuring the strength and integrity of the newly lined pipe.
5. Final Inspection:
Once the curing process is complete, a final inspection is conducted to verify the quality and integrity of the lined pipe. Advanced camera technology is used to assess the effectiveness of the lining, ensure proper adhesion to the existing pipe walls, and confirm that all repairs have been successfully completed. This comprehensive inspection provides homeowners with peace of mind knowing that their plumbing system has been restored to optimal condition.
Conclusion:
The pipe lining process offers homeowners a cost-effective, efficient, and minimally disruptive solution for rehabilitating existing pipelines. By understanding the steps involved in the pipe lining process, homeowners can confidently navigate their plumbing repairs and ensure the long-term integrity and functionality of their plumbing systems. Whether addressing leaks, corrosion, or structural damage, pipe lining provides a reliable and sustainable solution for maintaining a healthy and efficient plumbing infrastructure.